7 Workflow Tips for Alfred 3
If you used Alfred 2 to create your own workflows, you'll have adopted the new Alfred 3 workflow tools as easily as one slips in their favourite comfy slippers. But you may not have noticed that we've transformed them into jetpack-powered, laser-guided super-slippers!
Alfred 3 workflows are vastly more flexible. They include many new objects that allow you to do more without coding anything yourself, as well as features that make creation more efficient.
As you discover workflows and start creating your own, here are a few tips to help you make the most of them, whether the workflows are for your own use, for your team and friends or to share with the wider Alfred community.
1. Insert new objects before/after existing ones
Once you've added a few objects and connected together, the quickest way to add new objects is to right-click the object next to the one you want to add.
You can then insert before, after or even replace the selected object, saving you the hassle of manually re-connecting objects to each other.

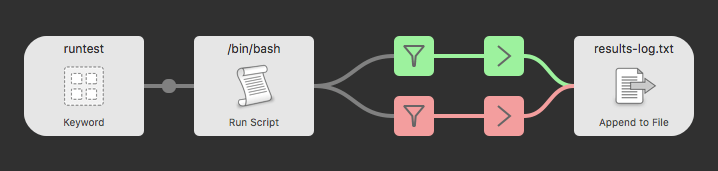
2. Use colours to identify streams or outcomes
Another one of my favourite additions is the ability to colour-code workflows. Right-click to see the configuration menu and choose a colour for the selected objects.
While I sometimes add them just for fun, colours can also be helpful in identifying workflow streams, such as passing or failing when a script is run.
3. Copy objects or their configuration
Need to duplicate objects? Select as many objects as you like, and copy them with Cmd + C, then paste them somewhere else in the workflow, or in another workflow.
Alternatively, right-click an object and choose "Copy Configuration" (e.g. its keyword, text and settings), then right-click another object of the same type and choose "Paste Configuration".
4. Click the grid to show workflow in Finder
Each workflow object includes a little dotted grid next to the Cancel/Save button; Clicking this icon will open the workflow's folder in Finder, making it easy to add relevant icons, scripts or files to your workflow folder.
5. Add notes to objects
You can annotate any object to add useful information; What the object does, notes on improving your own workflow at a later date, tips to explain the workflow to other users.
To add a note, right-click an object and choose "Edit note".
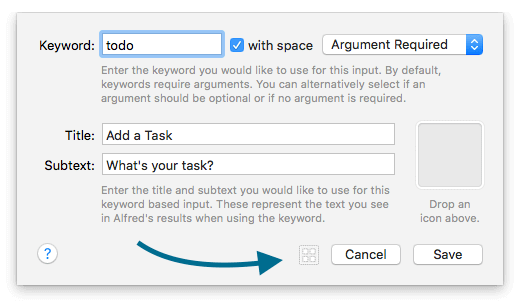
6. Include a workflow introduction and version number
Hand in hand with annotating the workflow itself, you can now add an "About This Workflow" section, which will be shown to users who import your workflow. It's a good place to explain what it does, and highlight any special features of your workflow.
You can add a version number, as well as Workflow Environment Variables.
7. Use the ? for more info
Each workflow object (and every Alfred feature) has a question mark icon, so if you're looking for more information on using that particular object, click it to head to the help page for the object.
Don't forget to check out the Getting Started, Templates and Examples in the Workflows menu; You'll find lots of great ones to help you understand how you can make the most of workflows!